We use cookies to make your experience better. To comply with the new e-Privacy directive, we need to ask for your consent to set the cookies. Learn more.
Cheap Joe’s Art Stuff Art Blog
Tips, Tricks, Thoughts, and inspiration from across the art spectrum.
Mastering the Watercolor Pouring Technique

Watercolor painting has long been celebrated for its delicate and luminous qualities. Among the many techniques available to watercolor artists, the watercolor pouring technique stands out as a captivating method that yields mesmerizing results. This technique allows artists to create vibrant, fluid, and unpredictable compositions, giving life to unique and captivating pieces. For today’s post, we thought we’d explore the intricacies of the watercolor pouring technique and walk you through the process of creating your own masterpiece. You’ll learn which materials are necessary, and enjoy a step-by-step instruction process for mastering the pouring technique.

Understanding the Watercolor Pouring Technique
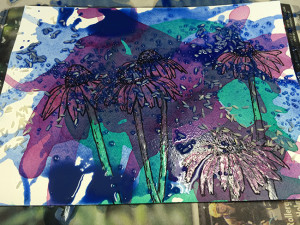
The watercolor pouring technique involves the controlled application of liquid watercolor pigments onto wet paper to create spontaneous and captivating effects. Unlike traditional watercolor painting methods where colors are built up gradually through layers, pouring involves the use of gravity to guide pigments across the paper, resulting in a free-flowing, organic appearance. This technique enables artists to achieve stunning gradients, unexpected color interactions, and a sense of movement that can't be replicated with other methods.
Materials Required
Before exploring into the technique itself, it's important to gather the necessary materials. In the instructional Linda Baker Watercolor Techniques – The Pouring Process video, Linda uses the following materials:
- Watercolor Paper: Choose a high-quality, heavy-weight watercolor paper that can handle the wet-on-wet application of pigments without warping or buckling.
- Liquid Watercolor Paints: Liquid watercolors provide intense color saturation and are ideal for the pouring technique.
- Water Containers: Prepare containers of clean water for wetting the paper and diluting the pigments.
- Watercolor Brushes: Have a variety of brushes on hand for wetting the paper, blending colors, and making minor adjustments.
- Masking Tape: Use masking tape to secure the edges of the paper and create a clean border.
- Paint Palettes and Mixing Trays: These are used to mix and control the consistency of the liquid watercolors.
- Pipettes or Droppers: These tools allow for precise control when pouring the pigments.
Step-by-Step Process
Once you’ve gathered your materials, it’s time to start painting: Just follow these steps:
- Preparation: Stretch and tape the watercolor paper to a sturdy surface to prevent warping. Ensure a clean working area and have all your materials ready.
- Wetting the Paper: Use a large brush or spray bottle to wet the entire surface of the paper. This creates an environment for the pigments to flow and blend seamlessly.
- Mixing Pigments: In the video, Linda uses plastic sheets as a mixing surface. Squeeze liquid watercolors onto the palette and experiment with various color combinations and dilutions. This step allows you to predict how colors will interact on the paper.
- Pouring the Pigments: With a pipette or dropper, carefully drop your diluted pigments onto the wet paper. Start with lighter colors and gradually introduce darker shades. Experiment with pouring from different heights and angles to achieve various effects.
- Tilting and Blending: Tilt the paper in different directions to guide the flow of pigments. Use a clean brush to blend colors, creating smooth transitions and avoiding harsh lines. Embrace the unpredictable nature of the technique while maintaining some control over the outcome.


You can also use masking fluid to mask areas where you want to preserve layers:

Tips and Considerations
Mastering the watercolor pouring technique requires a delicate balance between embracing experimentation and maintaining control. Begin by choosing a high-quality paper to withstand the pigments' saturation and understand that while controlled chaos is essential, intentional decisions through color selection and blending guide the artwork's direction. Patience during drying is crucial for preserving the envisioned outcome, and protecting your workspace ensures focus without distractions. Capturing the technique's essence lies in letting pigments flow naturally to evoke movement while learning from mistakes and unexpected results cultivates valuable insights for future improvements. This delicate interplay ultimately leads to the creation of mesmerizing artworks that embody the fluid beauty and dynamic energy intrinsic to the watercolor pouring technique.
Elevate Your Creations with Watercolor Pouring
The watercolor pouring technique is a captivating and experimental method that invites artists to relinquish some control while producing astonishingly beautiful results. By leveraging the power of gravity and fluid dynamics, artists can create unique and dynamic compositions that capture the essence of the medium. As you embark on your own watercolor painting journey, remember that every pour is a step towards uncovering the untamed beauty that emerges from the dance of water and color.
For more tips on mastering this medium, check out the Cheap Joe’s Art Stuff Blog. Posts like “How to Master Watercolor Painting” and “Getting Started with Watercolors” both feature plenty of beneficial advice that will have you on your way to being an expert at the craft. And don’t forget to shop Cheap Joe’s for all your watercolor supplies – we have an impressive selection of high-quality products for painters of all skill levels!


