We use cookies to make your experience better. To comply with the new e-Privacy directive, we need to ask for your consent to set the cookies. Learn more.
Cheap Joe’s Art Stuff Art Blog
Tips, Tricks, Thoughts, and inspiration from across the art spectrum.
Speedball Screenprinting Workshop!

Hey, everybody! A few weeks ago, we were lucky to have two representatives from Speedball come and show us how to use all the awesome new screen printing stuff we've just started carrying and how to use them!

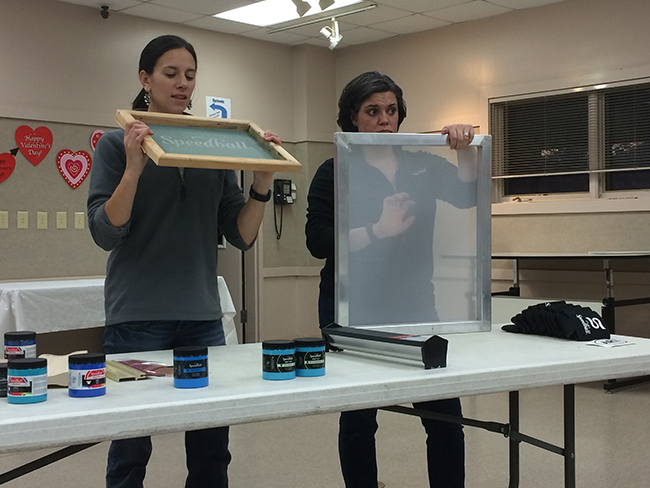
First, Kim (left) and Melissa (right) gave us a rundown of some of the inks we picked up.

The teal jar Melissa is holding is part of the line of Acrylic Screen Printing Ink--works the same as regular old acrylic paint, in that it's permanent when dry and highly pigmented for bold, opaque colors!
The dark blue jar is the Fabric Screen Printing Ink--just like it says, this is ink that is made to be used on fabric and will hold up to the most powerful washing machines once it's properly heat-set.
Of course you can use these inks interchangeably, but the acrylic goes on smoother and is ideal for putting down single layers on paper, while the fabric ink has a thicker consistency that'll definitely stick to your clothes!
Then we talked about the two kinds of screens we'll have: wooden and aluminum. The Wooden Screen Frames are your standard screen printing frames that work perfectly with both fabric and acrylic inks. The Aluminum Screen Frames are the step up from those because they're a bit sturdier and can have finer screens, allowing for more intricate printing details.

Next, Melissa explained to us the pros and cons of different screen-filling techniques. First, you've got your simple stencil method (which Kim is holding up), where you can tape either a stencil you've bought or cut out yourself to the back of your frame and then you push the ink through it and onto your surface.
Melissa said they've found that the Bienfang Graphics #360 Marker Paper works wonderfully for stencils because it's translucent, waterproof, and very easy to cut through. Speedball also has this great Block Out Tape with an adhesive strong enough to withstand inks without leaving any sticky residue on your screen!
Tip: a coworker who has a lot of experience in screen printing prefers to use vinyl stickers for stencils because they stick right to the screen and you don't have to worry about the possibility of them moving! Because of the impermanence of stencils, this technique is recommended for those who are only making a handful of prints.
Second, there's the drawing fluid technique.

As you can see from the labels, the bottom layer is just Drawing Fluid used on a screen if you printed this as is, you would get ink on everything except for "Speedball Drawing Fluid." The middle layer is drawing fluid with Screen Filler in the remaining empty parts of the screen (ya know, because it fills the holes). This is the next step you would take if you wanted to get to the top layer, where they've rinsed the drawing fluid while the screen filler stays to make it so "Speedball" is now the only thing that gets inked. This method is more permanent and reliable than the stencil method and is recommended for those who are making <100 prints.
And then there's the photo emulsion technique--the most advanced method of screen printing.

The top layer is your blank screen (obviously. The next layer is filled in with a mixture of Photo Emulsion and Sensitizer--you need BOTH of these for the photo emulsion technique and, thankfully, there's a kit to make sure you have the right ratio! Once that dries in a dark place (Melissa recommended the drawer under your oven if you don't have cookie sheets in there), place or tape a photo positive (meaning the dark parts are what you want to be inked) that's printed onto a clear surface, like polyester film or acetate onto the front of your screen. Rather than using a printed image, you could also paint directly onto your clear surface with some super-dark India Ink--whatever you do, just make sure your image is completely opaque. The final layer is the result of exposing your screen to a light source and then rinsing out the unexposed areas aka your design! This technique is extremely reliable and recommended for those who are making hundreds of prints.
If you're worried about not being able to reuse your screens, you shouldn't be! The drawing fluid and screen filler can both be washed out with soap and warm water, and the photo emulsion can be removed with--you guessed it--Photo Emulsion Remover!
After dropping all of this knowledge on us, Kim and Melissa thought it was time for the fun part: printing! Since they already had a photo emulsion screen ready, we jumped right in to print some Speedball logos on these awesome bags they brought for us!

With a craft stick, I applied what I thought was a reasonable amount of ink to the top of my screen...

But Melissa said I needed more, so I added more. With screen printing, you don't need to worry about using too much ink because whatever you don't use can simply be added back into your jar and saved for another print!

Then came the moment of truth! Melissa explained how I should hold my Squeegee at about a 45-degree angle and drag the ink down my screen slowly and carefully.

If you don't have a friend or Speedball representative to hold your screen down for you, it's necessary to grab a Base Unit to keep it from sliding around.

Once I pulled the ink over the screen once, I was done!

But Melissa says it's a good idea to pull the ink back over your design (with your screen in the air above your surface) as what is referred to as "flooding."

This fills ONLY your design with ink and makes it ready for a second pull across your surface.

Woohoo! Look at that! My very own screen printed bag!
After that, we had a little fun with cutting out our own stencils and using different inks for different surfaces.

Here's Web, our call center supervisor, about to print with a stencil I made for him.

This gorgeous blue is actually part of the Night-Glo line, which glows in the dark!

Night-Glo comes in fabric ink as well as acrylic ink, giving our outlet store manager, Amanda, the opportunity to brand her apron with this design she made of her initials!

In the light, this design made by our search engine optimizer, Megan, is a radiant "Peacock Blue."

But with the lights out, it glows an incredible green! I've had some issues getting even coverage with glow-in-the-dark paint before, but screen printing ensures perfectly even coating!
You can probably tell I'm pretty excited about this new line of supplies, so go and check them out yourselves!

Recent Posts


